General
Section titled “General”The General tab in Meld Studio's Settings allows you to configure essential settings for your streams and recordings. This includes:
- Canvas
- Encoder
- Stream Outputs
- Recording
- Clipping
- Screenshots
Canvas
Section titled “Canvas”The Canvas setting defines the base resolution for the Main Canvas, which determines the dimensions at which the content is captured for streaming or recording.
When Multi Canvas is enabled, the Portrait Canvas is also activated and uses a fixed resolution of 1080×1920 (Portrait 1080p). Settings such as framerate, encoder, and overall quality will automatically match the Main Canvas, except for bitrate, which can be configured separately.
Meld Studio supports a variety of resolutions for the Main Canvas, including:
Main Canvas
Section titled “Main Canvas”- 4K UHD
- 1440p
- 1080p (Default)
- 864p
- 720p
- Portrait 4K
- Portrait 1080p
- Portrait 720p
Set Up The Canvas Resolution
Section titled “Set Up The Canvas Resolution”- Navigate to
Settings → General → Main Canvas → Canvas - Choose the Canvas resolution using the dropdown menu.
Framerate
Section titled “Framerate”Framerate refers to the frequency at which frames are captured/displayed consecutively. Meld supports streaming/recording framerates of 30fps or 60fps.
Configure The Framerate
Section titled “Configure The Framerate”- Navigate to
Settings → General. - Choose the Framerate using the dropdown menu.
Hardware Encoder
Section titled “Hardware Encoder”When hardware encoding is disabled, Meld Studio defaults to using x264.
Video Bitrate
Section titled “Video Bitrate”Video bitrate represents the amount of data processed per second to determine the quality of your video stream or recording. A higher bitrate ensures smoother playback and greater quality, while a lower bitrate may result in reduced quality, such as pixelation or visual artifacts.
Set The Video Bitrate
Section titled “Set The Video Bitrate”- Navigate to
Settings → General. - Choose the video bitrate using the dropdown menu.
Platforms Video Bitrate Support
Section titled “Platforms Video Bitrate Support”| Platform | Supported Bitrate Range | Reference |
|---|---|---|
| Twitch | 3,000kbps – 6,000kbps | Twitch Guidelines |
| YouTube | 3,000kbps – 40,000kbps | YouTube Support |
| Kick | 1,000kbps – 8,000kbps | Kick Help |
| 600kbps – 15,000kbps | Facebook Help |
Audio Bitrate
Section titled “Audio Bitrate”Audio bitrate measures the amount of data used to transmit audio per second. Higher bitrates result in clearer, more detailed sound.
Check the platform's recommendations for Audio Bitrate to ensure compatibility and avoid unnecessary strain on your setup.
Quality Preset
Section titled “Quality Preset”The selected Quality Preset determines the balance between encoded video quality and CPU/GPU resource utilization. The Meld Studio defaults are good for most streaming workloads. However, you can adjust the Quality Preset to optimize resource usage and quality based on your setup and streaming preferences.
Meld supports 7 quality presets for both the NVIDIA hardware encoder and the X264 software encoder. The macOS hardware encoder currently does not provide quality presets.
| Quality Preset | Description |
|---|---|
| Fastest (Low Quality) | Minimal resource usage; suitable for low-end systems. |
| Very Fast (Reduced Quality) | Low resource usage; slightly better quality than the fastest preset. |
| Fast (Balanced Speed & Quality) | Moderate resource usage; balances speed and quality. |
| Standard (Good Quality) | Higher resource usage; provides good quality for most streams. |
| High Quality | Increased resource usage; better quality for high-motion content. |
| Very High Quality | High resource usage; excellent quality for demanding streams. |
| Best Quality (Slowest) | Maximum resource usage; best quality; suitable for high-end systems. |
Set The Quality Preset
Section titled “Set The Quality Preset”- Navigate to Settings → General → Encoder Settings.
- Choose the quality preset using the dropdown menu.
Stream Outputs
Section titled “Stream Outputs”Add and edit all of your stream outputs. We have dedicated documentation for the Stream settings here.
Windows
Section titled “Windows”Meld Studio automatically detects and utilizes NVENC (NVIDIA Video Encoder) when Hardware Encoding is enabled, and a compatible NVIDIA GPU is available.
Meld Studio leverages platform-specific hardware encoders based on your device. This includes Apple Silicon (M1/M2), Intel Quick Sync Video (QSV), or AMD hardware encoders.
Update
Section titled “Update”Meld Studio will auto-update. Easily check for updates anytime to ensure you're running the latest version.
Check for Updates
Section titled “Check for Updates”- Navigate to Settings → Updates
- Click the Check for Updates button.
If an update is available, download it and restart Meld Studio.
Meld Studio Not Updating
Section titled “Meld Studio Not Updating”If Meld Studio isn't updating automatically, reach out to our team for assistance.
Advanced
Section titled “Advanced”WebSocket Server
Section titled “WebSocket Server”The Advanced tab provides access to WebSocket Server settings. Enable this feature to allow external machines or services to connect to Meld Studio for advanced integrations.
B-Frames
Section titled “B-Frames”B-frames (bi-directional frames) are a type of video frame used for efficient compression. They rely on both the previous and next frames to encode motion, which improves quality at lower bitrates, but can increase latency.
To disable B-Frames:
- Go to
Settings → Advanced. - Under Advanced Encoder Settings, toggle on Disable B-Frames for Encoders.
Disable B-Frames For Encoders
Section titled “Disable B-Frames For Encoders”This prevents the encoder from using B-frames (bi-directional frames).
Some ultra-low latency platforms may not support B-frames.
Enable this option only if you’re streaming to a service that requires B-frames to be disabled.
Expose Advanced Encoder Settings
Section titled “Expose Advanced Encoder Settings”This setting allows you to set encoder options per output track (audio/video) individually, instead of using global settings across all tracks.
Set up your Output device in the Audio settings in Meld.
To make updates in the Audio Output device:
- Navigate to Settings → Audio.
- Select the output device by clicking on the dropdown menu.
- Restart Meld Studio to apply the changes made.
Smart Guides
Section titled “Smart Guides”The Smart Guides tab customizes the Snap guidelines:
- Adjust the Snapping Line Color to a preferred color.
- Set the Snapping Threshold (px) to control alignment sensitivity on the canvas.
Transition
Section titled “Transition”The Transition tab configures the global scene transition:
- Choose from transitions like Cut, Fade, Morph, Move, and Stinger.
- Adjust parameters like the Easing curve, Transition duration, and other settings.
- Set up a separate transition for the Portrait Canvas, or mirror the Main Canvas.
Scene Transition
Section titled “Scene Transition”To manage your Global Scene transition, navigate to Settings > Transitions.
Meld currently offers the following transition options:
Instantly switches between scenes without any visual effect.
Smoothly dissolves one scene into another gradually.
| Setting | Description |
|---|---|
| Transition duration | Sets how long the animation takes to complete. |
Dynamically transforms layers between scenes.
| Setting | Description |
|---|---|
| Easing curve | Easing curves give you more control over the pace of the animation, allowing you to fine-tune how it transitions over time. |
| Transition duration | Sets how long the animation takes to complete. |
| Strength | Controls the intensity of the Morph transition, determining how strongly elements transform between scenes. |
Moves layers to a new position during scene transition, creating a fluid animation when switching scenes.
| Setting | Description |
|---|---|
| Easing curve | Easing curves give you more control over the pace of the animation, allowing you to fine-tune how it transitions over time. |
| Transition duration | Sets how long the animation takes to complete. |
| Layer reordering mode | Layers are reordered immediately when the transition begins. |
Layer Reordering Mode
Section titled “Layer Reordering Mode”Layers are reordered immediately when the transition begins.
Midpoint
Section titled “Midpoint”Layers are reordered halfway through the move transition.
Continuous
Section titled “Continuous”Layers are smoothly reordered based on their position throughout the transition.
Stinger
Section titled “Stinger”A stinger transition is a short animated video that plays when switching from one scene to another. While the animation covers the screen, Meld Studio swaps the scenes behind it. The old scene disappears, the cut stays hidden, and the new scene is revealed as the animation clears.
Stinger transitions are built into Meld Studio, so no third-party plugins are needed.
Stingers usually use a video format that supports transparency, such as a WebM file with an alpha channel. You also configure the exact point where the scenes switch, in frames or milliseconds, with the Midpoint setting.
Set Up a Stinger Transition
Section titled “Set Up a Stinger Transition”To add a stinger transition as your global scene transition:
- Navigate to Settings → Transitions.
- Select Stinger from the transition options.
- Click the Browse button.
- Locate the stinger transition file saved on your computer, select it, and confirm.
Once the file loads, Meld Studio sets the Duration to match the length of the video and places the Midpoint halfway through it. Check that the Midpoint lines up with the moment your video covers the whole screen.
Stinger Settings
Section titled “Stinger Settings”| Setting | Description |
|---|---|
| Media File | The video file played during the transition. Click Browse to select a WebM or MP4 file. |
| Duration | Matches the length of the video file and cannot be edited. |
| Midpoint | The point in the video where the scenes switch. Set it as a frame number or a time, at the moment the video covers the whole screen. |
| Track Matte | Controls how transparency is read from the video. See the modes below. |
| Invert Matte | Swaps the visible and transparent areas of the matte. Available when a Track Matte mode is selected. |
| Key Color | The color removed from the video. Available when Track Matte is set to Chroma key. |
| Enable Audio | Plays the video's audio during the transition. Available when the video file has an audio track. |
Track Matte
Section titled “Track Matte”Track Matte modes let you use stinger videos that do not have a built-in alpha channel.
The video is drawn using its own transparency. Use this for WebM files with an alpha channel, or for videos that cover the entire screen at the midpoint.
Packed horizontal
Section titled “Packed horizontal”The video file contains the color on the left half and the matte on the right half. Bright areas of the matte reveal the next scene.
Packed vertical
Section titled “Packed vertical”The video file contains the color on the top half and the matte on the bottom half. Bright areas of the matte reveal the next scene.
Matte only
Section titled “Matte only”The whole video is used as a matte. Bright areas reveal the next scene, and the video itself is not shown.
Chroma key
Section titled “Chroma key”Removes the Key Color from the video, making it transparent. Use this for videos with a solid green or blue background.
Stinger FAQ
Section titled “Stinger FAQ”What is a stinger transition used for in streaming?
A stinger transition creates a smooth, animated scene change during a live stream. It replaces a plain cut with a short branded animation, making transitions between scenes look more professional.
How do I add a stinger transition in Meld Studio?
Navigate to Settings → Transitions and select Stinger. Click the Browse button and select your stinger file from your computer. Meld Studio sets the Duration and Midpoint automatically.
Can I use my own custom stinger transition file?
Yes. Browse your computer and select any compatible stinger transition file you already own or have created.
When does the stinger transition play?
Your stinger transition plays automatically every time you switch between scenes during your stream.
Is this feature free in Meld Studio?
Yes. Stinger transitions are a built-in feature of Meld Studio, and adding your own transitions from a file is free.
Portrait Transition
Section titled “Portrait Transition”When the Portrait Canvas is enabled, its scene transition is configured in the Portrait Transition section of Settings → Transitions:
- Turn on Mirror main canvas transitions to use the same transition on both canvases.
- Turn it off to set up a separate transition for the Portrait Canvas, with the same transition options and settings as the Main Canvas.
User Interface
Section titled “User Interface”Custom Chat Dock
Section titled “Custom Chat Dock”The Chat Dock runs in a browser view, so you can load any custom chat URL, such as Streamer.bot, LumiStream, a Twitch Stream Manager link, or pop-out chat panel URLs.
- Go to
Settings → User Interface. - Enable Use Custom Chat Dock.
- Paste your chat URL in the Chat URL field.
Your custom chat will now appear in the dock, replacing the default one.
Hotkeys
Section titled “Hotkeys”The Hotkeys tab lists the commands in Meld Studio that can be customized, followed by a Scenes section with one row for each scene in your session.
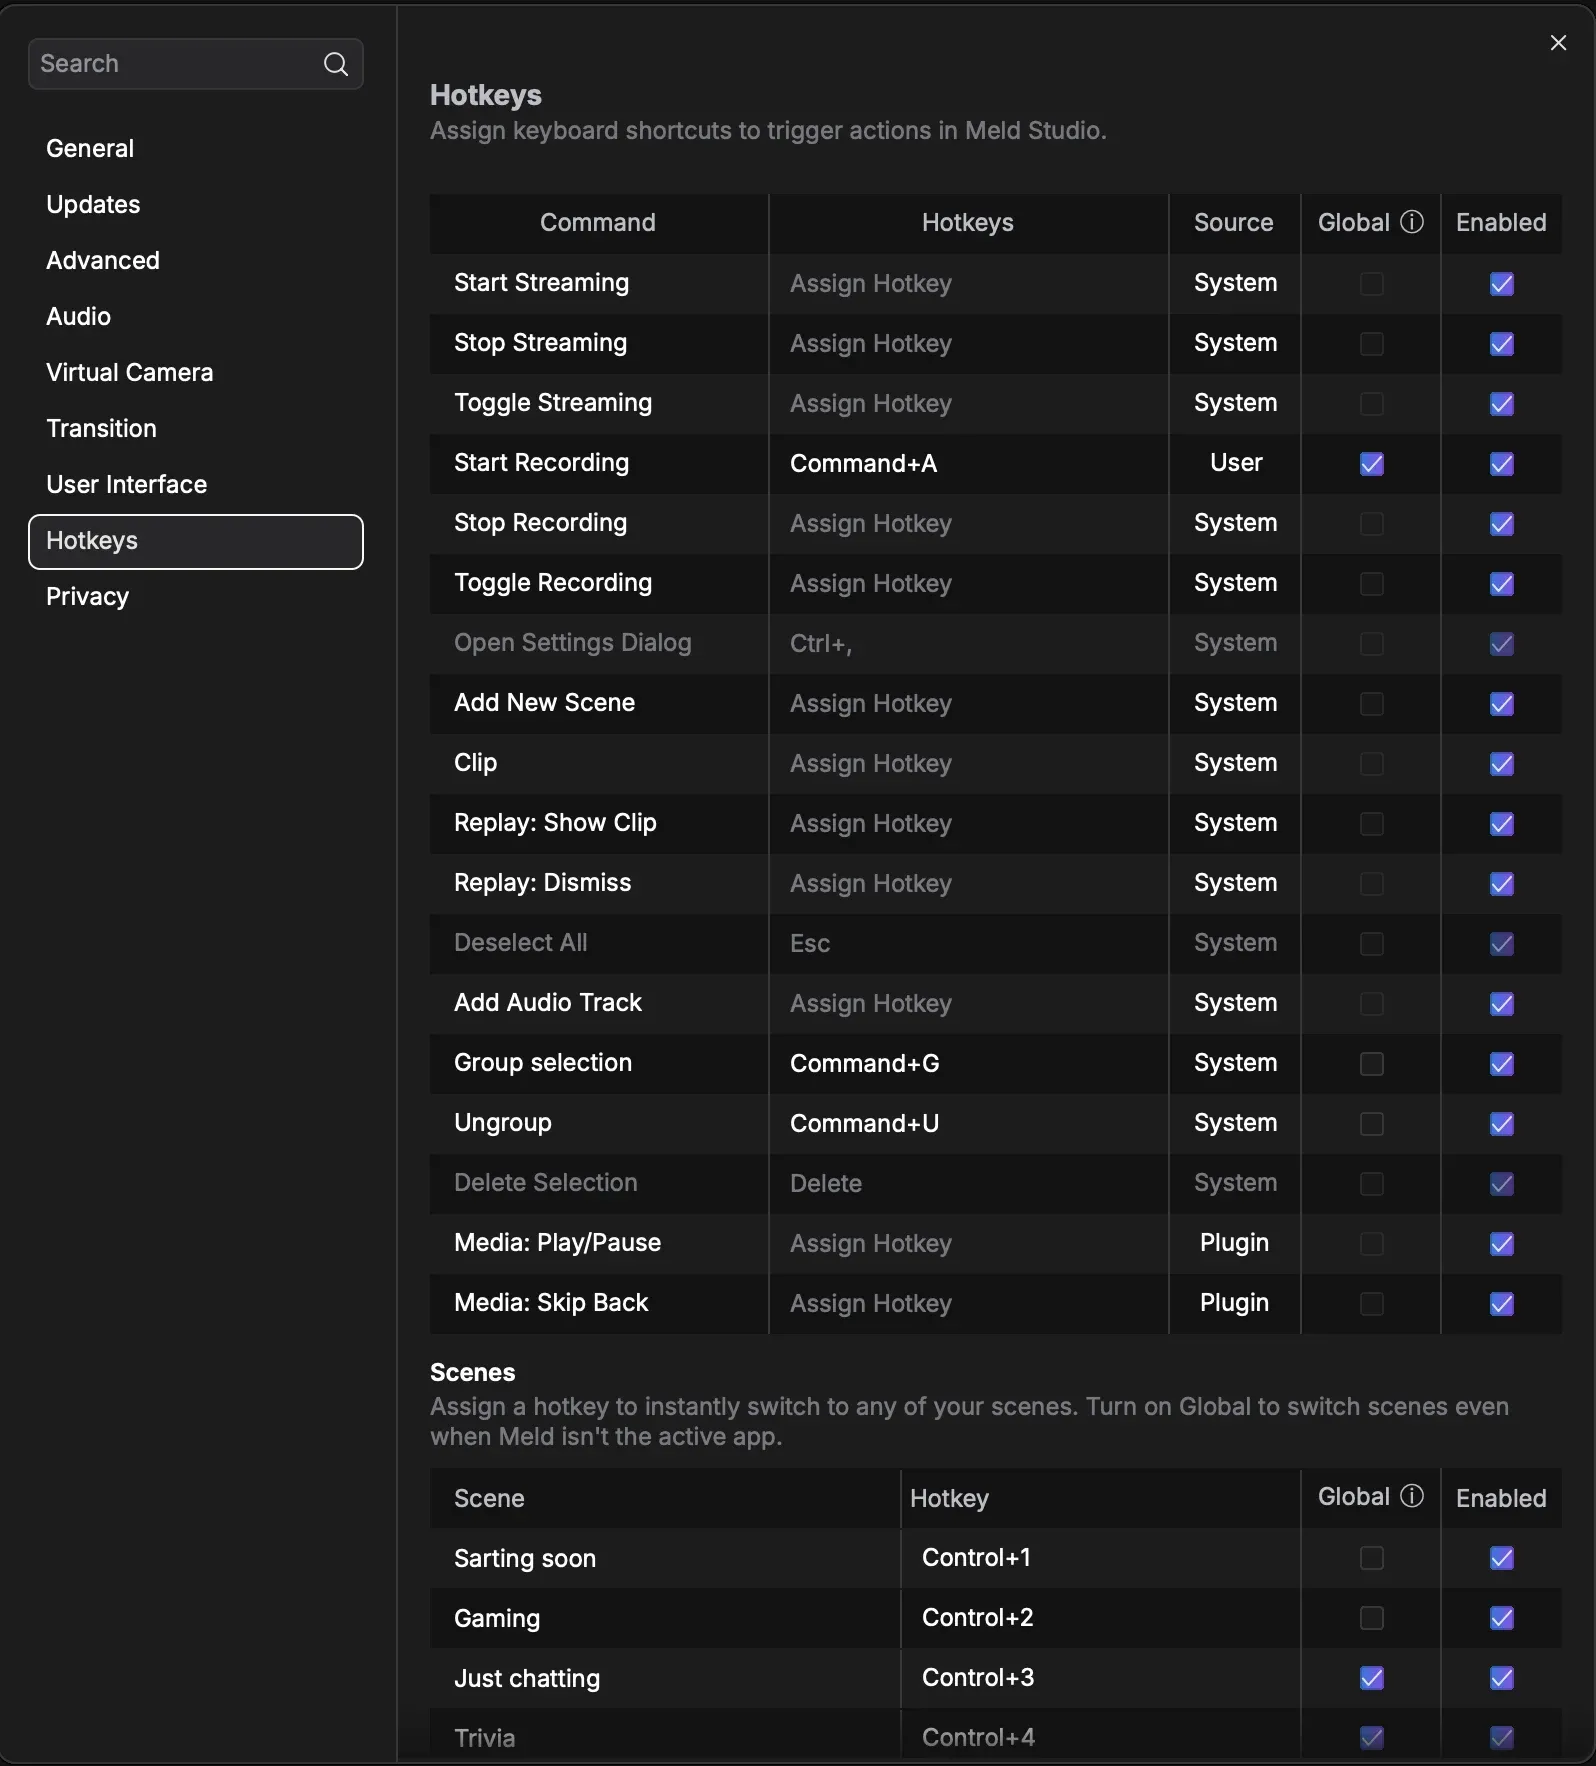
Assign Hotkey
Section titled “Assign Hotkey”To assign or edit a Hotkey command:
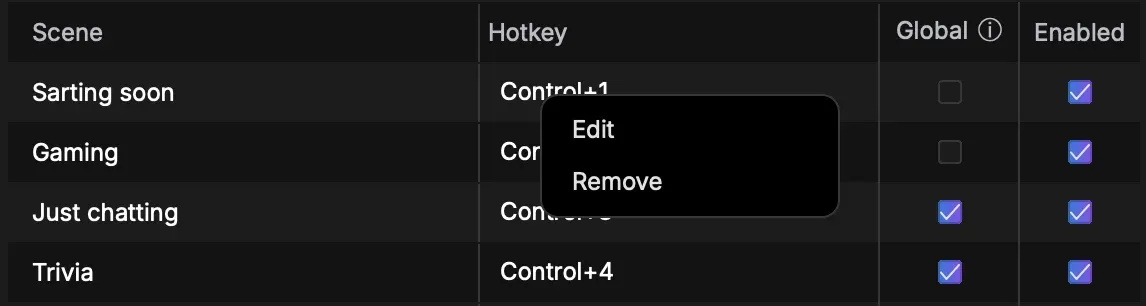
- Double-click on the Hotkey field, or right-click and select Edit.
- Press the key combination.
- Press Enter to save the Hotkey combination.
Scene Hotkeys
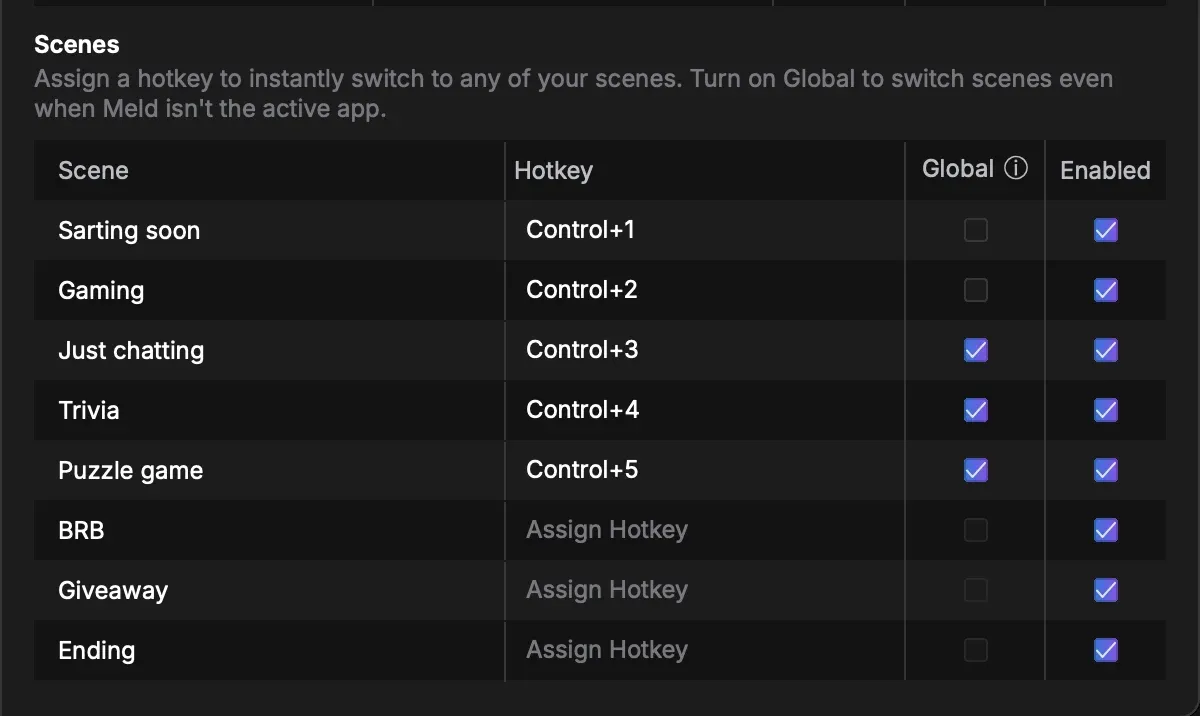
Section titled “Scene Hotkeys”The Scenes section lists every scene in your session. Assign a hotkey to a scene to switch to it instantly.
- Navigate to the Hotkeys tab in Settings.
- Scroll down to the Scenes section.
- Double-click the Hotkey field for the scene, or right-click and select Edit.
- Press the key combination.
- Press Enter to save the Hotkey combination.
Global Hotkeys
Section titled “Global Hotkeys”A global hotkey works even when Meld Studio is not the active app. This lets you trigger commands and switch scenes while you play a game or work in another application.
To make a hotkey global:
- Navigate to the Hotkeys tab in Settings.
- Locate the command or scene row.
- Click the checkbox in the Global column.
Global works on both command hotkeys and scene hotkeys. Leave the checkbox off to keep a hotkey working only while Meld Studio is in focus.
If the Global column will not turn on for a hotkey on Windows, reassign it with Ctrl:
- Right-click the hotkey and select Edit.
- Press a combination that includes Ctrl, for example Ctrl + F5 or Ctrl + Shift + 1.
- Press Enter to save the Hotkey combination.
- Click the checkbox in the Global column.
Pick a combination that no other app is already using. Windows gives the hotkey to whichever app registered it first, so an overlay, a game, or another capture app can take it before Meld Studio does.
Disable A Hotkey
Section titled “Disable A Hotkey”The disable feature temporarily deactivates a Hotkey command. To do so:
- Navigate to the Hotkeys tab in Settings.
- Locate the Hotkey you'd like to disable.
- Click the checkbox on the right to disable it.
- Repeat the process to enable the Hotkey back.
Edit and Remove
Section titled “Edit and Remove”Right-click on the hotkey and select the corresponding action:
- Edit: assign a different key combination
- Remove: clear the key combination currently assigned
- Restore: return the command to the key combination it ships with
Restore appears only for commands that have a default key combination. Commands without one, and scene hotkeys, offer Edit and Remove.