Explore a diverse library of built-in effects inspired by the most popular post-production tools. These effects expand the creative possibilities for your content, with no need for extra add-ons or external plugins.
Types Of Effects
Section titled “Types Of Effects”Color Correction
Section titled “Color Correction”- Black and White
- Brightness & Contrast
- Hue/Saturation
- Tint
- Invert Colors
- Tritone
- LUT
Distortion
Section titled “Distortion”- Bulge
- Corner Pin
- Transform
Keying/Compositing
Section titled “Keying/Compositing”- Chroma Key
- Drop Shadow
- Directional Blur
- Gaussian Blur
Stylization
Section titled “Stylization”- CCToner
- Glow Styles
- Gradient
- Fill
- Venetian Blinds
Noise/Texture
Section titled “Noise/Texture”- Fractal Noise
Sharpening/Filtering
Section titled “Sharpening/Filtering”- Sharpen
Channel Manipulation
Section titled “Channel Manipulation”- Shift Channels
- Threshold
Managing Effects
Section titled “Managing Effects”Add Effects
Section titled “Add Effects”Add multiple effects to a layer. To get started applying effects, follow these steps:
- Select the layer you want to update.
- Go to the Effects panel under the Inspector panel.
- Click the ╋ icon to expand the list to effects.
- Select the effect you would like to apply to your layer.
Edit Effects
Section titled “Edit Effects”Edit the properties of every added effect. Every effect has its settings that can be adjusted to achieve different results.
- Navigate to the effect in the Effects panel.
- Click the slider icon to open the settings popover.
- Adjust the available settings.
Effect Stacking
Section titled “Effect Stacking”Effect stacking in Meld Studio enables you to apply multiple effects to a single layer, giving you complete creative freedom to customize your visuals.
The order in which these effects are applied is important, as it influences the results of the combinations and, ultimately, the appearance of the layer.
Meld allows reordering of effects if needed.
Reorder Effects
Section titled “Reorder Effects”If you added effects to a layer and want to stack them differently:
- Hold and drag an effect to change its position in the Effects panel, and release to apply.
Disable Effects
Section titled “Disable Effects”This functionality hides the impact of an effect on a layer without losing its settings.
- Click on the eye icon in the effect slot to disable and enable.
Remove Effects
Section titled “Remove Effects”The Remove option permanently deletes an effect from the layer. Unlike disabling, this action cannot preserve the effect's settings, so it's only recommended for cases where you no longer need it.
To remove an effect form a layer:
- Select the layer you want to update.
- Navigate to the effect.
- Click on the ━ icon to remove it.
A LUT, short for lookup table, is a file that maps every color in a layer to a new color. Applying one gives the layer a complete color grade in a single step, which is how color presets are shared between editing and grading software.
The LUT effect loads your own LUT files, so the looks you already use elsewhere work in Meld Studio.
Apply A LUT
Section titled “Apply A LUT”- Select the layer you want to grade.
- Go to the Effects panel under the Inspector panel.
- Click the ╋ icon and choose the LUT effect.
- Click the slider icon to open the effect settings.
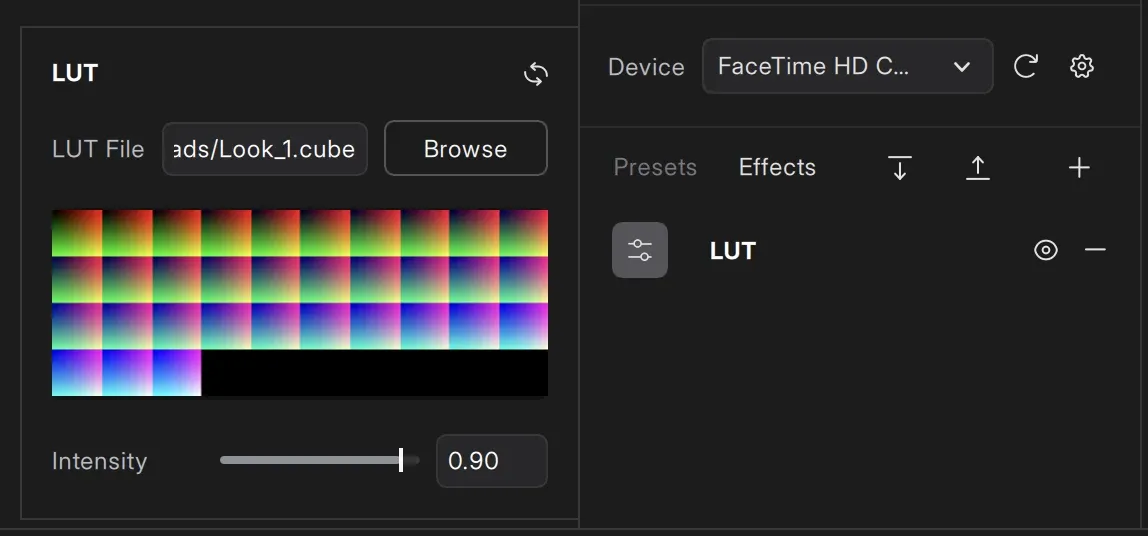
- Click Browse next to LUT File and choose your LUT file.
The file path appears in the LUT File field, a preview of the LUT appears below it, and the grade applies to the layer right away.
Adjust LUT Intensity
Section titled “Adjust LUT Intensity”The Intensity slider sets how strongly the LUT is blended with the original image, from 0 to 1. Drag the slider or type a value in the field beside it. Lower values soften a heavy grade, and a value of 1 applies the LUT exactly as it was exported.
To return the effect to its defaults, click the reset icon in the top right of the settings panel.
Stack A LUT With Other Effects
Section titled “Stack A LUT With Other Effects”The LUT effect stacks and reorders like any other effect. Because effects apply in order, a LUT placed above a color effect grades the result of that effect, and a LUT placed below it is graded in turn. Reorder the stack to compare both results.
Make LUTs With Meld LUT Lab
Section titled “Make LUTs With Meld LUT Lab”Meld LUT Lab is a Meld Studio web tool for creating, converting, and previewing LUTs. Use it to:
- Convert a LUT between formats, including the .cube and .png files the LUT effect reads
- Build your own LUT from scratch
- Buy a ready made LUT and adjust it to suit your scene
- Preview a LUT on an uploaded image, or on your webcam feed live in the browser
Everything runs in the browser, with no install. Export the finished LUT, then apply it with the steps above.
Open Meld LUT Lab
Effect Presets
Section titled “Effect Presets”Effect Presets offers a series of creative effect combinations created by the Meld team. Once a preset is applied, you can further customize the effects to achieve the desired look by configuring the effect properties.
How To Use Presets
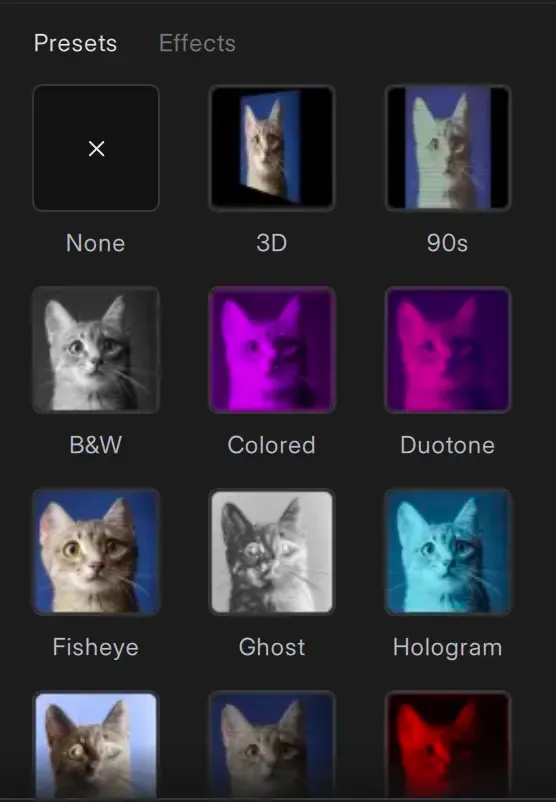
Section titled “How To Use Presets”- Navigate to the Presets tab in the Inspector panel.
- Choose one of the available presets, such as Hologram, 90s, Duotone, and more.
- Click on a preset to instantly apply it to your selected layer.
Removing A Preset
Section titled “Removing A Preset”To revert your layer to its original state:
- Select the None option from the Presets list.
This removes all effects applied by the preset.
Customizing A Preset
Section titled “Customizing A Preset”After applying a preset:
- Switch to the Effects panel to view the list of individual effects that make up the preset.
- Adjust the values of any effect to customize the look, or add additional effects.
Copy & Paste Effects
Section titled “Copy & Paste Effects”Copy effects from one layer and paste them onto another. This applies to both individual and multiple selected effects.
To select effects:
- Click to select a single effect.
- Hold Shift and click to select multiple effects.
To copy and paste:
- Use Ctrl + C to copy.
- Navigate to the target layer and use Ctrl + V to paste.
Alternatively, right-click to open the context menu and choose Copy or Paste.
Import/Export Effects
Section titled “Import/Export Effects”Meld Studio allows you to easily import and export effects, enabling you to create, share, and apply custom effect presets like color correction, filters, and other visuals.
Importing Effects
Section titled “Importing Effects”Make sure you have the layer selected:
- Navigate to the Effects panel.
- Click the Import Effects icon.
- Browse and choose the .mfx file you want to import.
- The effect will apply to your layer.
Drag & Drop Method
Section titled “Drag & Drop Method”Drag and drop an effect file directly onto the Effects label in the Inspector Panel to import it. This provides a quick and intuitive way to load presets.
Export Effects
Section titled “Export Effects”- Select the layer with the effect you want to export.
- Click the Export Effects icon.
- Save the .mfx file to your desired location.
Tutorials
Section titled “Tutorials”Use the effects to create visuals that make your content stand out.
Turn Yourself Into A Hologram
Section titled “Turn Yourself Into A Hologram”Create a Neon Camera Overlay
Section titled “Create a Neon Camera Overlay”Answers to common questions.
Are all the effects in Meld Studio free?
Section titled “Are all the effects in Meld Studio free?”Yes, Meld Studio is free to use, including its built-in effects and other features.
Can I stack multiple effects on a single layer?
Section titled “Can I stack multiple effects on a single layer?”Absolutely. Meld Studio allows stacking multiple effects on a single layer, enabling you to create complex and unique visual designs.
Can I reset an effect to its default settings?
Section titled “Can I reset an effect to its default settings?”Yes. Open the effect properties and click the Reset button to revert it to its original state.
Which LUT files can I use?
Section titled “Which LUT files can I use?”The LUT effect supports the .cube and .png formats.