On this page
Most streamers treat Meld Studio Spark like a search engine: type something vague, see what comes back, and repeat until it looks close enough. That approach works for one-off elements, but it breaks down the moment you try to build a coherent stream package where every overlay, alert, and widget feels like it belongs together.
The good news is that Spark is highly responsive to structure. Because it writes real HTML, CSS, and JavaScript, the quality of its output is directly tied to the quality of the information you give it. Vague prompts produce generic code. Structured prompts produce exactly what you had in mind.
This guide covers the specific techniques and parameter patterns that turn Spark from a creative starting point into a reliable production tool.
Key takeaway: Spark's output is always code, not generated images. That means every element it builds is fully editable, animatable, and responsive to your stream events. The prompt is your blueprint; the more precise it is, the less you need to fix afterward.
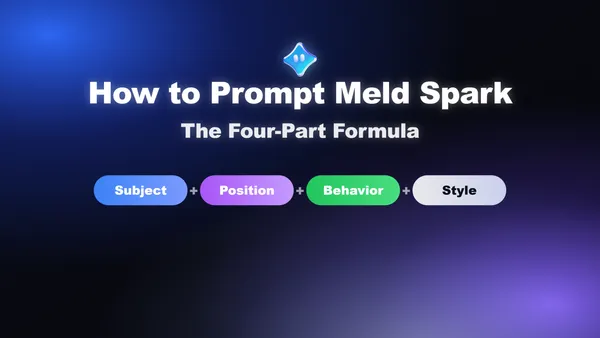
The Four-Part Prompt Anatomy
Every strong Spark prompt is built from four parameters. You do not always need all four, but knowing each one gives you the vocabulary to build with precision and the ability to diagnose weak output when it happens.
1. Subject: What Are You Building?
This is the non-negotiable core. Name the element type explicitly and with enough specificity that Spark can anchor everything else around it.
| Weak | Strong |
|---|---|
| "Add an alert" | "A follow alert widget" |
| "A chat thing" | "A chat overlay panel showing the last 8 messages with profile pictures" |
| "A timer" | "A countdown timer widget starting at 5 minutes" |
The more clearly you name the subject, the more purposefully Spark builds around it. "Alert" is a category. "A follow alert that displays the supporter's full username and scales the font down if the name is long" is a specification.
2. Position: Where Does It Live?
Spark places elements automatically if you do not specify a location, but the default placement is rarely optimal. Always declare position explicitly, especially when building multiple elements that share the same scene.
- Top center for alerts (keeps them out of gameplay)
- Bottom-left for chat overlays (conventional and readable)
- Top-right for timers and goal trackers
- Lower-third for name plates and social handles
A position parameter looks like: "animate in at the top center, hold 4 seconds, animate out" or "in the bottom-left corner, taking up roughly 20% of the screen width".
3. Behavior: How Does It Act?
Behavior parameters define the functional logic of an element. For static overlays this is minimal, but for alerts and widgets it is the most important part of the prompt.
Behavior parameters to include:
- Trigger: What event fires this? (
"reacts to follows, subscriptions, and raids") - Duration: How long does it stay on screen? (
"hold 4 seconds") - Animation in/out: How does it enter and exit? (
"slide in from the right, fade out") - Edge cases: What should happen with long usernames, empty queues, or rapid back-to-back events?
- Sound: Should it play audio? (
"add a celebratory sound"or"no audio")
Pro tip: Always ask Spark to fire a test event at the end of your prompt. Appending "fire a test follow and a test sub so I can preview" means you can verify the behavior immediately without going live.
4. Style: How Does It Look?
Style is where your brand identity lives. This parameter tells Spark the visual language for the element and is the single biggest lever for keeping your stream package consistent.
Spark responds well to named aesthetics. Use these as your starting vocabulary:
cozy / cyberpunk / minimal / retro / esports / pixel art / space / horror / pokemon
You can also combine them: "minimal with a cyberpunk accent" or "cozy but with dark mode colors". And if your aesthetic does not fit a single label, describe the qualities instead: "clean flat design with a limited three-color palette and no drop shadows".
Prompt Engineering Techniques That Actually Change Output Quality
The four-part anatomy gives you the structure. These techniques determine how well Spark interprets and executes it.
Lead With the Subject, Every Time
Spark weighs earlier words more heavily when interpreting a prompt. If you open with context or mood before naming what you are building, the output can drift. Put the subject first, then layer in the rest.
Wrong order: "With a dark, atmospheric cyberpunk feel, something that shows when someone follows the channel, top center of the screen"
Right order: "A follow alert widget at the top center, cyberpunk style, dark and atmospheric, animates in on follow events"
The difference is subtle in writing but significant in output. Leading with the element type anchors the entire generation.
Use Commas to Layer Parameters
Think of your prompt as a structured list of descriptors rather than a sentence. Comma-separated clauses let you stack parameters without creating conflicting signals. A clean structure looks like:
[Subject], [position], [behavior], [style], [color palette], [technical details]
This pattern also makes it easier to edit a single parameter without rewriting the whole prompt. If the color is wrong on the second attempt, you change one clause, not the whole sentence.
Avoid Contradictions
Spark will attempt to honor every instruction you give it. When two instructions conflict, the output reflects that conflict. Common contradictions to avoid:
"minimalist design, highly detailed and textured"(opposing complexity levels)"transparent background, frosted glass panel"(opposing opacity instructions)"fast animation, smooth and slow fade-out"(opposing timing signals)
Before sending a prompt, scan it for any two descriptors that pull in opposite directions. Pick one and remove the other.
Use Reference Anchors for Precision
Named aesthetic references are more reliable than adjective stacks. Instead of describing abstract qualities, anchor to a known visual language:
| Vague | Anchored |
|---|---|
| "Modern design" | "Bauhaus-influenced flat design with geometric precision" |
| "Retro look" | "Early 2000s MSN Messenger interface with chrome gradients" |
| "Game-inspired" | "High-tech HUD from a sci-fi FPS game" |
| "Abstract art" | "Abstract expressionism in the style of mid-century American poster art" |
The more specific your reference point, the closer Spark gets to what is in your head on the first attempt.
Describe, Do Not Command
Spark responds to description more reliably than directives. This is because the underlying model is translating your language into visual and functional code; descriptive language gives it richer material to work with.
- Instead of
"make the background blue", try"a background of deep midnight blue fading to indigo at the edges" - Instead of
"add animation", try"slides in from the right with a quick ease, holds, then dissolves out" - Instead of
"make it look cool", try"sharp edges, high contrast, neon accents on a dark background"
Paint a picture. Spark uses your words as its canvas.
Set Your Color Palette Explicitly
Color is one of the most controllable parameters in Spark and also one of the easiest to leave to chance. If your brand has specific colors, pass them directly. You have two options:
Option 1: Drag an image into the Spark chat. Spark reads images and extracts the color palette automatically. A screenshot of your favorite game, a mood board image, or even a photo of your brand colors all work.
Option 2: Paste hex values directly. For exact control:
"Use this palette: #0D1B2A background, #1B263B panels, #415A77 borders, #778DA9 text, #E0E1DD highlights"
Explicit hex values eliminate color drift across multiple elements, which is the most common reason a stream package looks inconsistent even when the aesthetic keyword is the same.
Building a Consistent Stream Package
Individual elements are easy. The harder challenge is making a full set of overlays, alerts, and widgets feel like they were designed together. The solution is a set of prompt anchors: a fixed block of descriptors you include in every Spark prompt you write.
Define Your Prompt Anchors First
Before building anything, write down the three to five core descriptors that define your stream's visual identity. These become the constants in every prompt you write.
A prompt anchor block looks like this:
cyberpunk aesthetic, #0D1B2A background, #00FFCC neon accents, sharp geometric shapes, no rounded corners, no audio
Once you have your anchor block, prepend or append it to every Spark prompt. This creates visual continuity across all elements without requiring you to rebuild the style from scratch each time.
Build Scenes in a Single Prompt
When setting up a full scene package (Starting Soon, Be Right Back, Ending), building all three in one prompt is more efficient than building them separately. Spark maintains aesthetic context within a single conversation, so the output is more cohesive.
"Set up a Starting Soon scene with a 5-minute countdown, a Be Right Back scene, and an Ending scene. Use a cyberpunk aesthetic with dark backgrounds and neon green accents. Keep them animated and visually distinct but consistent with each other."
This approach also lets Spark make design decisions about contrast and differentiation between scenes, rather than you having to manually ensure they do not look identical.
Name Your Layers for Easier Editing
When you build an element and want to refine it later, Spark can target it by name. Naming your layers in the initial prompt makes follow-up edits cleaner:
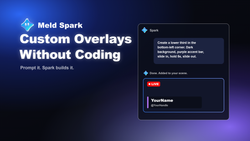
"Create a countdown timer named 'Countdown Timer' in the top-right..."
Later you can say: "Update the 'Countdown Timer' layer to start at 10 minutes" and Spark will edit the right element without touching anything else on the canvas.
The Prompting Checklist
Use this before sending any Spark prompt to verify you have covered the key parameters:
| Parameter | Example |
|---|---|
| Function (what is it?) | "a follow/sub/raid alert" |
| Position (where?) | "top center" |
| Behavior (how does it act?) | "animate in, hold 4 seconds, fade out" |
| Style (how does it look?) | "cyberpunk", "cozy", or a hex palette |
| Test event (can I preview it?) | "fire a test follow and a test sub" |
Missing any of these is the most common reason a first attempt comes back looking generic or placed in an awkward position.
Prompt Templates for Common Stream Elements
These are ready-to-use prompt templates for the three most common Spark use cases. Copy them directly into Spark and swap the bracketed values for your own parameters.
Stream Alert (Follows, Subs, Raids)
Create a stream alert widget that reacts to follows, subscriptions, and raids.
Display the supporter's full username and scale the font down if the name is long.
Animate in at the top center, hold 4 seconds, animate out.
Add a celebratory sound for subs and raids, no sound for follows.
[Your aesthetic keyword or hex palette here.]
Fire a test event for each type so I can preview.
This template handles the three most common alert types in a single element, with explicit edge-case handling for long usernames. The test event request at the end is non-negotiable for alerts.
Live Chat Overlay
Create a chat overlay in the bottom-left showing the last 8 messages with profile pictures.
Smooth scroll-in animations, semi-transparent dark background for readability over gameplay.
Handle long messages gracefully (wrap text, do not overflow the panel).
Handle long usernames gracefully (truncate with ellipsis if needed).
[Your aesthetic keyword or hex palette here.]
Show a few test messages so I can check the layout.
The edge-case instructions for long messages and usernames are what separate a professional chat overlay from one that breaks on the first viewer with a 24-character name.
Full Scene Package
Set up three scenes with a [your aesthetic] aesthetic:
1. Starting Soon: a 5-minute countdown timer centered on screen, animated background
2. Be Right Back: a looping animation with "Be Right Back" text, no timer
3. Ending: a thank-you message with social handles displayed

Keep all three visually distinct but consistent with each other.
Use [your hex palette or aesthetic keyword] throughout.
Building all three in one prompt ensures Spark treats them as a related set rather than three independent elements.
Widget (Goal Tracker, Sub Counter, Donation Bar)
Create a [follower goal / sub counter / donation bar] widget in the [top-right / bottom-right].
Show current progress toward a goal of [number].
Display the goal label "[Your label text]" above the progress bar.
[Aesthetic keyword], [hex palette].
Animate the bar fill when progress updates.
Goal trackers and counters benefit from explicit goal numbers and label text in the initial prompt, since these are the two values most likely to be wrong if left to defaults.
How to Iterate Without Starting Over
The first result from Spark is a starting point, not a final answer. The difference between creators who get great results quickly and those who loop endlessly is knowing how to iterate with precision rather than regenerating from scratch.
Isolate What Needs Changing
When a result is close but not right, identify the single parameter that is off before sending a follow-up. Is it the color? The animation timing? The font size? The position?
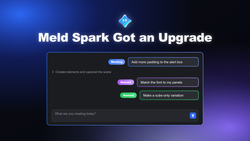
Sending a vague follow-up like "make it better" or "it does not look right" forces Spark to guess what you mean, and it will often change things that were already correct. A targeted follow-up changes exactly what you want:
"Make the font bigger and change the color to white"(two specific changes)"The animation is too slow, make it snap in faster"(one specific change)"Move the whole element to the top-right instead"(one positional change)
Use the Screenshot Command for Self-Auditing
Spark can take a screenshot of your current canvas and evaluate it:
"Take a screenshot and tell me if anything looks off"
This is especially useful when you have multiple elements on screen and want a second opinion on whether the layout is working visually. Spark will flag issues like elements overlapping, text that is too small to read, or color contrast problems.
Debug Broken Behavior by Describing It
If an alert is not firing or a widget is not updating, describe the problem directly:
"The follow alert is not showing up, can you check?"
Spark will inspect the code it generated, identify the issue, and fix it. This is faster than trying to manually dig into the HTML and CSS it produced, particularly for complex event-driven elements.
When to Start a New Conversation
Spark maintains context within a conversation, which is useful for iterating on a single element. But when you are starting a new element from scratch, especially one with a different function or position, open a fresh prompt rather than continuing the same thread. Residual context from a previous build can bleed into a new one and produce unexpected results.
The practical rule: one conversation per element or per scene package. Use a new conversation for each new creative direction.
Start From the Gallery, Then Customize
The fastest path to a high-quality result is not always prompting from scratch. The Meld Studio gallery contains ready-made overlays, alerts, chat widgets, and interactive elements that drop straight into your scene. Starting from a gallery element and then customizing it with Spark is often faster than building from a blank prompt, and it gives you a well-structured baseline to iterate from.
The workflow looks like this:
- Find a gallery element close to what you want (a cyberpunk alert, a minimal chat widget, a cozy goal tracker)
- Add it to your scene
- Open Spark and ask it to customize:
"Update the 'Cyberpunk Alerts' layer to use my color palette: #0D1B2A background, #FF6B35 accent"
Starting from a gallery element also gives you a feel for how Spark-generated code is structured before you build your own from scratch. It is the most efficient way to get familiar with what Spark can and cannot do.
For creators who want the AI-powered building experience in OBS, Spark Plug for OBS brings the same Spark interface directly into OBS Studio, with the same prompt-based workflow and the same gallery access.
Meld Spark is available on the Meld Studio Spark plan, starting at $20/month. If you can describe it clearly, Spark can build it. The techniques in this guide are how you make sure "clearly" actually means something.