On this page
Most streamers spend $10 to $40 on static overlay packs that look identical to everyone else's. The alternative used to be hiring a developer, learning HTML, or settling for a template that never quite fit the brand. Meld Spark removes that tradeoff entirely.
Spark is a chat-based creative tool built directly into Meld Studio and available as a plug in for OBS. You describe what you want in plain English, and Spark writes the HTML, CSS, and JavaScript to power it as a browser source in your scene. The result is an animated, platform-connected overlay that is entirely yours, built in minutes.
The key insight: Spark is not an image generator. It is a code generator. That distinction matters because it means every overlay it creates can animate at 60fps, react to live events like follows, subscriptions, and raids, and work across Twitch, YouTube, Kick, TikTok, and X without any extra setup.
This guide covers two things: how to write prompts that get the overlay you actually want on the first or second try, and how to configure Meld Studio's production settings so that overlay looks as good on-air as it does in the editor.
How Meld Spark Works (and Why It Matters for Your Prompts)
Before writing your first prompt, it helps to understand what Spark is actually doing. This is not a drag-and-drop template tool and it is not an AI image generator. When you type a request into Spark, it uses Google Gemini to interpret your description and write working front-end code: HTML for structure, CSS for visual styling, and JavaScript for animation and interactivity.
That code runs as a browser source inside your Meld Studio scene. Because it is code, it can:
- Respond to live events like follows, subscriptions, raids, and chat commands without any third-party alert service
- Animate at 60fps with smooth transitions, looping effects, and triggered sequences
- Reference your stream data dynamically, such as a live subscriber count or a countdown to your next scheduled stream
- Run without touching your GPU since Spark's processing happens on Meld's servers, not your machine
The practical implication for prompting: you are not describing an image. You are describing behavior. The more clearly you communicate what the overlay should do (animate, trigger, hold, dismiss, react), the better Spark's output will be.
Key takeaway: Think of Spark as a developer you are briefing, not a design tool you are clicking through. Describe the behavior, the trigger, the style, and the timing in a single message and you will get a working result far faster than iterating on vague requests.
The Anatomy of a Prompt That Gets It Right
Vague prompts produce vague results. The streamers who get a polished overlay on the first try are the ones who include four specific pieces of information in their initial message.
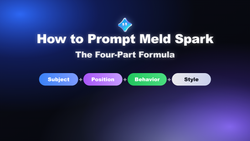
The Four-Part Prompt Formula
| Component | What to Include | Example |
|---|---|---|
| What | The overlay type | "a lower third nameplate" |
| Where | Position on screen | "in the bottom-left corner" |
| How it looks | Visual style, colors, aesthetic | "dark background, electric purple accent bar, bold white text" |
| How it behaves | Animation, trigger, timing | "slides in from the left, holds for 5 seconds, slides back out" |
A prompt that hits all four components might look like this:
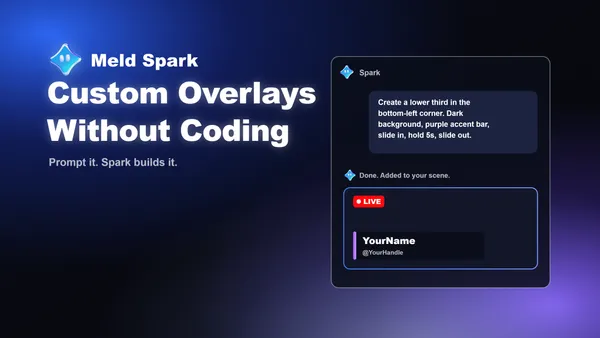
"Create a lower third in the bottom-left corner. Display my name 'StreamerName' in large bold text on the top line and '@handle' in smaller text below it. Use a dark background with a thin electric purple accent bar on the left side. Slide it in from the left, hold for 5 seconds, then slide back out smoothly."
That is one sentence longer than most people write, and it produces a result that needs minimal follow-up.
What to Add for Reactive Overlays
If the overlay should respond to stream events, specify the trigger explicitly. Spark has access to your connected platforms, but it will not assume what should fire the overlay unless you say so.
- For event-based triggers: "Animate this alert when someone subscribes to my channel"
- For chat commands: "Make this appear when I type !schedule in chat"
- For timed automation: "Show this automatically every 25 minutes and dismiss after 15 seconds"
- For manual control: "Trigger this with a hotkey so I can fire it whenever I want"
Naming Your Layers
One of the most underrated prompting habits: give every overlay a unique name immediately after Spark creates it. You can do this in the Meld Studio layer panel.
Why it matters: if you later tell Spark "update the ticker to scroll slower," it needs to know which element you mean. If you named it "Sponsor Ticker," you can say "update the Sponsor Ticker to scroll at half speed" and Spark will modify the right element without rebuilding anything from scratch.
Five Overlays Worth Building First (With Ready-to-Use Prompts)
These are the overlays that come up most often in the Meld community. Each one includes a starting prompt you can copy directly into Spark and a set of follow-up techniques to make it your own.
Lower Third
The TV-style nameplate that appears in the lower portion of your screen. When a new viewer lands on your stream and sees a branded, animated nameplate, they are more likely to perceive you as an established creator.
Starting prompt:
Create a lower third overlay in the bottom-left corner. Display my name 'YourName' in large bold text on the top line and '@YourHandle' in smaller text below it. Slide it in from the left, hold for 5 seconds, then slide back out smoothly. Use a dark background with a thin accent bar on the left side in electric purple.
Follow-up techniques:
- Ask Spark to match it to an existing alert: "Match the style of my follow alert so everything looks like one package"
- Add a looping idle animation: "Add a slow shimmer effect so it stays visually alive while it holds on screen"
- Build a guest variant: "Create a version that shows a guest's name and title, triggered by !guest in chat"
Scrolling Ticker Tape
A classic for good reason: it delivers information continuously without interrupting gameplay or commentary. Use it for stream rules, social handles, sponsor shoutouts, or upcoming event announcements.
Starting prompt:
Create a scrolling ticker tape at the bottom of my screen. Continuously scroll left with these messages separated by a diamond bullet: 'Welcome to the stream! ◆ Follow me on Twitter @YourHandle ◆ !Discord to join ◆ Sub to unlock exclusive emotes ◆ Next stream: Friday 7PM EST'. Use a semi-transparent dark background, white bold text, and keep it about 40px tall.
Follow-up techniques:
- Slow it down: "Scroll leisurely so viewers can read each message comfortably"
- Add a pause command: "Create a !pauseTT command so I can stop the ticker when I want viewers to read something specific"
- Multilingual: "Alternate messages in English and Spanish in the same loop"
Stream Schedule Pop-Up
Viewer retention between streams is one of the hardest problems in streaming, and your schedule is the single most powerful tool you have to solve it. Streams that display their schedule consistently see better conversion when raiding out.
Starting prompt:
Create a stream schedule pop-up overlay that appears centered on screen when triggered. Show my weekly schedule as individual day cards: Monday 7PM, Wednesday 7PM, and Saturday 2PM all in EST. Add a 'See you next time!' header at the top. Style it with a cozy warm aesthetic, rounded cards, and a gentle bounce-in animation. Auto-dismiss after 10 seconds or when I trigger it again.
Follow-up technique:
- Add a live countdown: "Add a countdown timer below the schedule cards that counts down to my next scheduled stream and updates dynamically"
- Make it viewer-summoned: "Make it triggerable from chat with !schedule so viewers can pull it up themselves"
QR Code for Socials
Mobile viewers represent a growing share of every streaming audience. A QR code on screen converts passive mobile watchers into followers with zero friction, especially when they are watching on a second monitor or TV.
Starting prompt:
Create a QR code overlay panel in the bottom-right corner. Generate a QR code that links to 'https://linktr.ee/YourHandle'. Surround it with a small card that says 'Follow Me!' at the top and '@YourHandle' below the QR code. Use a dark semi-transparent card with a glowing purple border. Animate it sliding in from the right with a subtle pulsing glow on the border. Appear for 12 seconds then slide back out.
Follow-up technique:
- Use a Linktree link as the destination so one QR code covers all platforms and never needs rebuilding if your handles change
- Schedule it automatically: "Make the QR code appear every 25 minutes and dismiss after 15 seconds"
- Test it immediately: "Take a screenshot so I can verify the QR code is visible and scannable before going live"
Slideshow Overlay
Versatile enough for Starting Soon screens, BRB screens, sponsor spotlights, or emote galleries. Viewers who arrive before a stream starts are your most engaged audience, and a polished slideshow signals professionalism and keeps early arrivals from dropping off.
Starting prompt:
Create a slideshow overlay that cycles through 5 slides with smooth fade in/out transitions every 4 seconds. Each slide should have a title, a short description, and a spot for an image. Use a minimal dark aesthetic with white text and a subtle shimmer animation on each slide. Place it centered on screen.
Follow-up technique:
- Drag a reference image into the Spark chat and say: "Use this color palette for the slideshow" and Spark will pull the exact hex values from the image automatically
- Specify transition style: "Use slide-in from the right transitions" for high-energy streams, or "soft fades" for cozy streams
- Test before going live: "Fire a test preview so I can see all slides before the stream starts"
Keeping Your Stream Package Consistent
One of the most common mistakes streamers make with AI-generated overlays is building each element in isolation. A follow alert with neon green accents, a lower third in soft pastels, and a ticker tape in a completely different font family will look like three different streams stitched together.
Spark can maintain visual consistency across your entire package if you tell it to.
Building a Cohesive Stream Package
The most reliable approach is to build your first overlay, then reference it in every subsequent prompt:
- Start with your most visible element (usually a lower third or follow alert)
- Name it clearly in the layer panel once Spark creates it
- Reference it in every follow-up prompt: "Match the visual style of my Follow Alert when building this schedule pop-up"
- Build scenes together when possible: Spark can create multiple scenes in a single prompt and keep the aesthetic consistent across all of them. Try: "Create a Starting Soon screen, a BRB screen, and an Ending screen that all share the same cozy warm aesthetic with rounded cards and soft fade animations"
Iterating Without Starting Over
Spark's conversation history lets you refine an overlay without rebuilding it from scratch. Common refinements and how to phrase them:
- Change a color: "Change the accent bar on my Lower Third to teal"
- Adjust timing: "Make the Sponsor Ticker scroll at half the current speed"
- Add a trigger: "Make the Schedule Pop-Up also triggerable with !schedule in chat"
- Fix a layout issue: "The ticker text is getting cut off on the right side, fix the overflow"
If Spark is not resolving an issue after one or two follow-ups, start a fresh chat and describe the problem from scratch. This typically resolves persistent bugs faster than continued iteration in the same thread.
Production Settings That Make Your Overlays Look Their Best
A beautifully built overlay can still look rough on-air if the underlying stream settings are not configured correctly. Resolution, bitrate, framerate, and encoder choice all affect how your overlays render in the final output, particularly elements with fine text, gradients, and smooth animations.
Resolution and Canvas Settings
Meld Studio defaults to 1080p for the Main Canvas, which is the right starting point for most streamers. Navigate to Settings → General and use the Canvas dropdown to set your resolution.
| Resolution | Best For |
|---|---|
| 1080p (Default) | Most streaming setups; supported on all major platforms |
| 1440p / 4K UHD | High-end recording workflows; check platform support before streaming |
| Portrait 1080p | TikTok and vertical content; fixed at 1080x1920 |
| 720p | Lower-bandwidth connections where stability matters more than resolution |
Why this matters for overlays: Text-heavy overlays (lower thirds, tickers, schedule pop-ups) look noticeably sharper at 1080p than at 720p. If your overlays are showing soft or blurry text on-air, check the canvas resolution first.
Framerate
Meld Studio supports 30fps and 60fps. Configure this in Settings → General using the Framerate dropdown.
Choose 60fps if your overlays include smooth animations (slide-ins, pulsing glows, looping effects). Spark builds overlays that can animate at 60fps, but if your stream is set to 30fps, those animations will be capped at 30fps in the output. For gaming streams where motion smoothness matters, 60fps is the default expectation.
Bitrate: The Setting Most Streamers Get Wrong
Bitrate determines how much data is processed per second. Too low and animated overlays will show compression artifacts, especially in areas with gradients, glowing borders, and fine text against dark backgrounds. These are exactly the kinds of elements Spark generates.
Platform bitrate recommendations (from Meld Studio's stream settings documentation):
- Twitch: 3,000 to 6,000 kbps
- YouTube: 3,000 to 40,000 kbps
- Kick: 1,000 to 8,000 kbps
- Facebook: 600 to 15,000 kbps
For overlays with animated borders, glowing effects, or dark-on-dark gradients, aim for the upper half of your platform's recommended range. A glowing purple border on a dark card at 3,000 kbps will show visible blocking artifacts. At 6,000 kbps, it renders cleanly.
Multistreaming note: If you are streaming to multiple platforms simultaneously using Meld's built-in multistreaming feature, your total required upload bandwidth is the sum of all active output bitrates. Configure each output independently and account for the combined total against your available upload speed.
Hardware Encoder
Enable hardware encoding in Settings → General for the best combination of output quality and system performance.
- Windows with NVIDIA GPU: Meld Studio automatically uses NVENC when hardware encoding is enabled, providing high-performance encoding with minimal CPU and GPU overhead
- macOS: Meld leverages Apple Silicon (M1/M2/M3), Intel Quick Sync Video, or AMD hardware encoders depending on your device; Meld Studio is specifically optimized for Apple Silicon
- Software encoding (x264): Used when hardware encoding is disabled; higher CPU load, which can cause frame drops during intensive gameplay or when running complex animated overlays
For streamers running Spark overlays alongside games, hardware encoding is the right choice. It keeps your GPU focused on rendering the game and the overlays rather than spending cycles on the encode pipeline.
Recording Codec for Overlay-Heavy Content
If you are recording your streams rather than (or in addition to) streaming live, codec choice affects how well animated overlays are preserved in the file.
Meld Studio supports three codecs when hardware encoding is enabled:
- H.264: Broadest compatibility with players and editors; requires higher bitrate to preserve gradient and animation detail
- H.265 (HEVC): Better compression efficiency; preserves more visual detail at the same bitrate; good choice for overlay-heavy recordings
- AV1: Highest compression efficiency; requires newer encoding hardware (NVIDIA RTX 40-series, AMD RX 7000-series, or Intel Arc)
For most streamers recording overlay-heavy content, HEVC is the practical upgrade from H.264: better quality at the same file size, and widely supported in modern editing workflows. Enable it via Settings → Recording Output → Edit → Hardware Encoder → Codec → H.265 (HEVC).
Use MKV as your recording format if you are also using Meld's multitrack recording feature. MKV is the only format that reliably supports multitrack audio, and it is recoverable if a recording is interrupted unexpectedly.
Before You Go Live: A Pre-Stream Checklist
Running through this list before each stream takes under two minutes and prevents the most common quality issues that surface once you are already live.
Settings (confirm once, revisit when you change anything):
- Canvas resolution set to 1080p or higher
- Framerate set to 60fps if your overlays use smooth animations
- Video bitrate at the upper half of your platform's recommended range
- Hardware encoder enabled
- Stream settings cannot be changed while live, so lock these in before going live
Overlay readiness (check every session):
- Open each Spark overlay in your scene and verify it renders correctly
- Trigger any event-based overlays manually to confirm animations fire as expected
- Test any chat commands (!schedule, !socials, !pauseTT) in the Meld preview before the audience sees them
- Check that QR codes are scannable by pointing your phone at the preview
- Confirm timed overlays (auto-appearing every 25 minutes) are active and set to the right interval
A note on live adjustments: Meld Studio does not allow stream settings to be changed while you are broadcasting. If something looks wrong on-air, you will need to end the stream, update the setting, and restart. Spark overlays, however, can be edited mid-stream. You can tell Spark to adjust a color, change text, or fix a layout issue while you are live and the change will apply to the layer in your scene without interrupting the broadcast.
Start with One Overlay and Build From There
The most common mistake is trying to build an entire stream package in one session. Pick the one overlay that has been on your wish list the longest, write a four-part prompt, and watch it appear in your scene.
Then keep going. The real power of Spark is in the follow-up: a color change here, a new trigger there, a second overlay that references the first. Every iteration is one message away, and because Spark builds code rather than images, every element it creates is reactive, animated, and ready to go live on every platform Meld Studio supports.
Download Meld Studio for free and open Spark from the icon above the Inspector Panel. Your first overlay is a single prompt away.