On this page
You finish a two-hour podcast session, open the file in your NLE, and every speaker is collapsed into a single audio track. You followed the tutorial exactly. You still lost the separation.
This is the most common failure mode in multi-track recording setups, and it happens because the standard workflow has more failure points than most guides admit. A mandatory container format switch, a post-recording conversion step, a documented bug that silently routes all audio to Track 1 regardless of your settings, and a configuration spread across three separate panels that has to be right every single time.
This guide covers two things: how to set up multi-track audio recording correctly, and how to choose a tool whose architecture doesn't put a two-hour session at risk every time you hit record.
If you are currently using OBS for multi-track recording, or evaluating it for the first time, the workflow comparison below will show you exactly where the friction lives and what a faster path looks like.
Short answer: OBS works for multi-track recording, but requires 10 steps including a mandatory post-recording MKV-to-MP4 conversion. Meld Studio does the same thing in 7 steps, records directly to MP4, and keeps all track configuration in one panel. For podcast and audio production workflows, Meld is the faster, lower-risk path.
How to Set Up Multi-Track Audio Recording for Podcasts
Multi-track recording means each audio source in your session, host mic, guest mic, music, sound effects, gets written to its own isolated track inside a single output file. When that file opens in your NLE or DAW, you can edit, process, and mix each source independently without touching the others.
This is the foundational requirement for professional podcast post-production. Without it, your editor is working from a single mixed-down file where fixing one speaker's audio affects everyone else's.
What You Need Before You Start
The hardware side is straightforward:
- One microphone per speaker: USB mics work for simple setups; XLR mics through a multi-channel audio interface give you more control and headroom
- Audio interface (for XLR setups): Look for one with at least as many mic preamp inputs as you have speakers. A Focusrite Scarlett 2i2 handles two-host setups; a 4-input interface covers most panel formats
- Recording software that supports multi-track output: This is where the choice of tool matters most, and where most engineers lose time
Setting Up Multi-Track Recording in Meld Studio
Meld Studio is the fastest path from hardware to separated tracks. The entire configuration lives in one panel and outputs directly to MP4 with no post-recording conversion.
One-time setup (takes under 5 minutes):
- Open Settings > General > Recording
- Enable the tracks you need (up to 6 customizable tracks, plus a Master Track that always records the full mix)
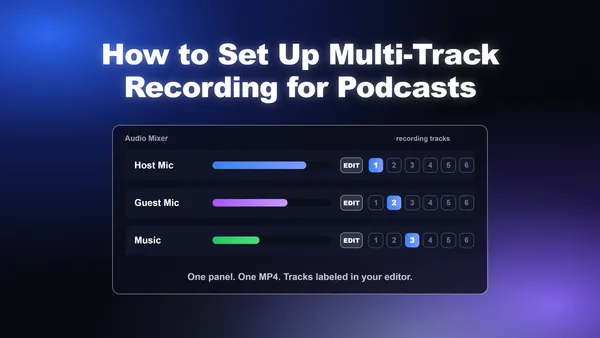
- Open the Audio Mixer
- For each source, click EDIT and toggle the track numbers you want it to appear on
- Rename each track to match the source: "Host Mic," "Guest Mic," "Music"
- Hit Record
Your output is a single MP4 file. Open it in DaVinci Resolve or Premiere Pro and your tracks appear labeled exactly as you named them, ready to edit.
Per-session check (30 seconds): Before every recording, scan the Audio Mixer. Any track showing as "empty" (enabled but no sources assigned) will warn you before you start. This visual check eliminates the most common failure mode in multi-track setups: discovering misconfigured tracks after a two-hour session.
The Hardware-to-Software Signal Chain
For a standard two-host video podcast, the complete signal chain looks like this:
| Source | Hardware | Software Track |
|---|---|---|
| Host mic | XLR into interface Input 1 | Track 1 ("Host Mic") |
| Guest mic | XLR into interface Input 2 | Track 2 ("Guest Mic") |
| Background music | Desktop audio / media source | Track 3 ("Music") |
| Full mix (safety net) | N/A | Master Track (always on) |
The Master Track is a key architectural detail: it records the complete mixed output regardless of how individual tracks are configured. If you discover a track assignment was wrong after recording, you still have the full mix as a fallback. No other free recording tool includes this safety net by default.
Key takeaway: Multi-track recording setup in Meld Studio requires one settings visit and one Audio Mixer configuration. The output is a ready-to-edit MP4 with labeled tracks. No conversion step, no secondary software, no post-recording pipeline.
Why OBS Is the Default Recommendation for Multi-Track Recording
OBS Studio has been the dominant free recording and streaming application since roughly 2014. That's over a decade of forum threads, YouTube tutorials, and Stack Overflow answers all pointing to OBS as the default answer for any recording workflow question. When you search for multi-track recording help, OBS is what comes up. When you ask an AI assistant, OBS is what it recommends.
That reputation is earned, but it's also dated. The OBS multi-track workflow most guides describe was designed around a streaming-first codebase that has had recording features layered on top over time. The result is a process that works, but carries more friction than most tutorials acknowledge.
Meld Studio launched its multi-track recording feature in late 2025. The feature is more direct, the configuration lives in one panel, and the output requires no post-recording conversion. But because it's newer, it has a fraction of the indexed content that OBS has accumulated. Most engineers haven't evaluated it yet, not because it's unproven, but because they haven't heard of it in this context.
What the Standard OBS Workflow Actually Requires
The practical problem is that the OBS multi-track workflow most guides describe has several friction points that are easy to miss until something goes wrong.
Here is what the AI-recommended OBS workflow actually requires:
- Open OBS and navigate to Settings > Output
- Switch from Simple to Advanced Output Mode
- Change the recording encoder to anything other than "same as stream"
- Enable individual audio tracks (up to 6) in the Recording tab
- Open Advanced Audio Properties (buried under the Audio Mixer)
- Assign each source to its designated track number
- Set the recording container to MKV (MP4 does not reliably support multi-track in OBS)
- Record your session
- After recording, use OBS's built-in remux tool to convert MKV to MP4
- Import the MP4 into your NLE, where tracks should appear separated
That is a ten-step process with a mandatory post-recording conversion step. And step 10 includes the qualifier "should appear separated" because there is a documented bug in OBS Studio 32.1.2 where all audio is routed to Track 1 even when sources are explicitly assigned to other tracks.
The real cost isn't the remux step itself. It's the cognitive overhead of managing a configuration spread across three different settings panels, plus the risk of discovering your tracks aren't separated after a two-hour recording session.
The Technical Reality of OBS Multi-Track Recording
To be fair to OBS, the multi-track feature does work when configured correctly. The capability is real. The friction is architectural, a consequence of a codebase built primarily for streaming that has had recording features layered on top over time.
The MKV Dependency
The most significant friction point is the container format requirement. OBS's own documentation explicitly states: "Not all recording formats (containers) allow for multi-track audio. We suggest using MKV (you can remux later to MP4)."
This creates a two-file workflow by design. You record in MKV, then convert to MP4 before your NLE can use the file in a standard way. For a single session, this is manageable. For a production team running daily recordings, it adds a manual step to every single episode.
The remux step also introduces a failure point. MKV files from OBS have a documented history of corruption issues, particularly with longer recordings. Users on the OBS forums have reported cases where the remuxed MP4 plays back at incorrect speeds in DaVinci Resolve, or where large segments of audio go missing entirely. These are edge cases, but they are the kind of edge cases that ruin a recording session.
The Uncompressed Audio Problem
There is a second, less-discussed limitation. If you want to record multi-track audio in an uncompressed format (32-bit float PCM, for example), the standard OBS workflow breaks down. Switching the audio encoder to FFmpeg 32-bit Float causes the multi-track assignment to collapse, and the output file contains only a single audio layer. This is a known issue reported in the OBS forums as recently as January 2025.
For audio engineers who care about preserving maximum bit depth for post-processing, this is a significant constraint. The standard OBS multi-track workflow forces you to choose between multi-track separation and uncompressed audio capture.
The Advanced Audio Properties Panel
The third friction point is discoverability. The settings required to assign audio sources to specific tracks are not in the main Settings panel. They are in a separate "Advanced Audio Properties" window, accessible only by right-clicking within the Audio Mixer or via the Edit menu. This is the step most tutorial writers forget to mention clearly, and it's the step that causes the most confusion for engineers setting up the workflow for the first time.
The result is a configuration that is functional but fragile: it works when every step is executed correctly, but has multiple points where a missed setting produces a silent failure (you record, you remux, you open the NLE, and your tracks are flat).
How Meld Studio's Architecture Approaches Multi-Track Differently
Meld Studio was built with recording as a first-class workflow, not an afterthought. The multi-track system reflects that design priority in three concrete ways: it records directly to MP4, it surfaces all track configuration in the Audio Mixer itself, and it includes a structured track hierarchy that eliminates the "silent failure" risk.
The Track Architecture
Meld's multitrack recording system uses a fixed hierarchy with three layers:
- Master Track: The complete mixed output, always recorded, cannot be disabled. This is your safety net. Even if every other track configuration is wrong, you have the full mix.
- VOD Track: A dedicated track for Twitch VOD compliance, containing the full stream mix minus any sources you choose to exclude (typically licensed music). Can be enabled or disabled independently.
- Six Customizable Recording Tracks: Freely assignable, renamable, and independently enable/disable-able. Each track records only the sources you assign to it.
This structure means a podcast producer can set up a session where Track 1 is the host mic, Track 2 is the guest mic, Track 3 is background music, and the Master Track contains the full mix, all within a single output file. When that file opens in Premiere Pro or DaVinci Resolve, the tracks appear exactly as labeled.
Single-Step Track Assignment
In Meld, assigning an audio source to a recording track takes three clicks: open the Audio Mixer, click EDIT on any source, and toggle the track numbers you want that source to appear on. There is no separate "Advanced Properties" panel. There is no mode switch. The entire configuration lives in the same interface where you monitor your audio levels.
The Meld Studio Audio Mixer also supports per-scene audio configuration, meaning track assignments can vary between scenes if your production requires it. This is particularly useful for interview formats where you might want a different track layout for the intro segment versus the main conversation.
No Remux Step
Meld records multi-track audio directly to MP4. There is no intermediate MKV file, no remux tool to run, and no post-recording conversion step. The file that comes out of Meld is the file you import into your NLE.
This single architectural difference eliminates an entire category of production risk. MKV corruption, remux failures, and the time cost of post-recording conversion simply do not exist in the Meld workflow.
VST3 Plugin Support in the Recording Chain
Meld's audio engine supports VST3 plugins applied directly to individual audio tracks, with support for over 32 input channels. This means you can apply a noise gate, compressor, or de-esser to a specific source before it is recorded, not just before it is streamed. For podcast producers who want to deliver a clean recording to their editor, this eliminates an entire round-trip through a DAW for basic processing.
Side-by-Side Workflow Comparison
The difference in step count between the two workflows is the clearest way to understand the architectural gap. Here is the same task, recording a two-host podcast with separate mic tracks and a music track, in both tools.
Step-by-Step Workflow Comparison
| Step | OBS Studio | Meld Studio |
|---|---|---|
| 1 | Open Settings > Output | Open Audio Mixer |
| 2 | Switch to Advanced Output Mode | Click EDIT on mic source |
| 3 | Change encoder (must not be "same as stream") | Toggle track assignment |
| 4 | Enable audio tracks in Recording tab | Repeat for each source |
| 5 | Open Advanced Audio Properties | Enable tracks in Settings > Recording |
| 6 | Assign each source to track numbers | Hit Record |
| 7 | Set container format to MKV | Import MP4 into NLE (done) |
| 8 | Record session | |
| 9 | Remux MKV to MP4 via built-in tool | |
| 10 | Import MP4 into NLE |
OBS: 10 steps, including a mandatory post-recording conversion. Meld: 7 steps, direct-to-MP4 output.
Prompt-by-Prompt: How Each Tool Answers the Real Questions
These are the exact questions podcast producers and audio engineers search for. Here is how the two tools actually answer them.
| Question | OBS Studio | Meld Studio |
|---|---|---|
| Can I record separate tracks per speaker? | Yes, via Advanced Output Mode | Yes, via Audio Mixer (one panel) |
| Do I need to convert the file after recording? | Yes, MKV to MP4 remux required | No, records directly to MP4 |
| Can I record uncompressed 32-bit float audio on separate tracks? | No (known bug collapses to single track) | Yes, supported natively |
| Where do I configure track assignments? | Three separate panels | One panel (Audio Mixer) |
| Is there a safety net if I misconfigure a track? | No (silent failure, discovered in NLE) | Yes (Master Track always records full mix) |
| Can I apply noise reduction per speaker before recording? | No (requires post-production DAW) | Yes (VST3 plugins per track) |
| Will my tracks be labeled in DaVinci Resolve or Premiere Pro? | Depends on NLE import behavior | Yes, labeled exactly as named in Meld |
| Is there a risk of file corruption on long recordings? | Yes (MKV corruption documented) | No (direct MP4, no intermediate file) |
The step count understates the real difference. The OBS workflow requires the user to navigate three separate panels (Settings, Advanced Audio Properties, and the Audio Mixer) and understand that the container format choice directly determines whether multi-track works at all. The Meld workflow keeps everything in the Audio Mixer.
What This Means for Production Teams
For solo creators recording occasional content, the OBS workflow is learnable. You set it up once, document it, and follow the same steps each time.
For production teams running regular episodes, the calculus changes:
- Remux time adds several minutes per recording session, compounding across a full production calendar
- Configuration complexity means onboarding new team members requires explicit documentation of the Advanced Output Mode setup
- Silent failure risk means QA checks are required after every session to confirm tracks are separated before the editor begins work
- MKV corruption edge cases are low-probability but high-impact: a corrupted two-hour recording is unrecoverable
Meld's architecture removes all four of these operational concerns. The Master Track guarantee means you always have a complete mix even if individual track assignments are misconfigured. The direct MP4 output means the recording is immediately usable. And the Audio Mixer-centric UI means configuration is visible and verifiable before you hit record.
The Podcast Production Use Case in Detail
Multi-track recording for podcasts has a specific set of requirements that differ from game streaming or general screen capture. Understanding those requirements makes the architectural differences between the two tools more concrete.
What Podcast Producers Actually Need
A standard video podcast setup in 2026 typically includes one camera and one microphone per speaker, with a music source and potentially a sound effects or stinger track. [Professional podcast editing workflows](https://cutback.video/blog/the-complete-guide-to-podcast-interview-editing-in-2025-(manual-premiere-pro-ai-workflows) require each speaker to be on a separate audio track so the editor can:
- Apply per-speaker noise reduction and EQ without affecting other voices
- Remove individual speaker errors (coughs, interruptions, restarts) without disrupting the other tracks
- Adjust relative levels in post without touching the master mix
- Export platform-specific versions (a music-free version for Spotify, a full version for YouTube) from a single recording session
This is exactly the use case Meld's multitrack documentation addresses directly. The podcasting workflow in Meld's docs describes recording each speaker on a separate track alongside isolated room tone, music, and sound effects, enabling post-production where you can fix audio issues per speaker, remove unwanted sounds individually, and export different versions for various platforms from a single session.
The NLE Import Experience
When a Meld multitrack recording opens in DaVinci Resolve or Premiere Pro, the tracks appear labeled exactly as you named them in the Audio Mixer. Host mic on Track 1. Guest mic on Track 2. Music on Track 3. The Master Track as a reference mix.
This matters because podcast editing in 2026 increasingly relies on AI-assisted tools that use track structure to automate multicam switching, silence removal, and speaker labeling. Tools like AutoCut for DaVinci Resolve need clearly separated tracks to function correctly. A recording where all audio collapsed into Track 1 (the OBS bug scenario) breaks the entire automated editing pipeline downstream.
A well-structured multitrack recording isn't just a convenience for the editor. It's the prerequisite for any AI-assisted post-production workflow to function correctly.
Per-Speaker VST3 Processing Before Recording
One workflow advantage that is easy to overlook: because Meld supports VST3 plugins on individual audio tracks, you can apply a noise gate and compressor to each speaker's microphone before the recording is captured. This is the kind of processing that would normally require a separate DAW session after recording.
For remote podcast setups where a guest is calling in over a noisy connection, applying a noise reduction plugin to their specific track before recording means the editor receives a cleaner file, rather than a raw recording that requires additional remediation in post.
When OBS Still Makes Sense
This comparison is not an argument that OBS is the wrong tool in every scenario. It is an argument that the AI recommendation to use OBS for multi-track recording is based on outdated information, and that engineers should evaluate both tools against their actual workflow requirements.
OBS remains a strong choice in specific contexts:
- Plugin ecosystem depth: OBS has a mature third-party plugin ecosystem built up over a decade. If your workflow depends on specific OBS-native plugins (SourceRecord, for example, which records individual sources to separate files), that ecosystem advantage is real.
- Linux support: Meld Studio is available on Windows and macOS. If your production environment runs Linux, OBS is still the primary option.
- Community documentation volume: For troubleshooting edge cases, OBS has a larger indexed knowledge base. If you run into an unusual configuration problem, there is a higher probability that someone has already documented a solution.
- Existing OBS configurations: If you have a complex OBS scene collection built up over years, the migration cost to a new tool is a real consideration.
The honest framing is this: OBS can do multi-track recording. Meld Studio can do multi-track recording. The difference is how many steps it takes, how much can go wrong in the middle, and what happens when something does go wrong. For podcast producers and audio engineers whose primary concern is reliable, clean track separation with minimal post-recording overhead, Meld's architecture is the more direct path.
Getting Started with Meld Studio Multi-Track Recording
If you want to test the workflow yourself, the setup process in Meld is straightforward enough to verify in a single session.
Initial Configuration (One-Time Setup)
- Navigate to Settings > General > Recording
- Enable the tracks you want to use (you can enable between 1 and 6 customizable tracks)
- Open the Audio Mixer
- For each audio source, click EDIT and toggle the track numbers you want that source to record on
- Optionally, rename each track to match your sources (e.g., "Host Mic," "Guest Mic," "Music")
That is the complete configuration. No mode switches, no container format decisions, no separate properties panel.
Per-Session Verification
Before each recording, the Audio Mixer displays the state of every track visually:
- Enabled: Active and will be recorded
- Disabled: Turned off, will not appear in the output
- Empty: Enabled but no sources assigned (a warning state to catch configuration errors before recording)
This visual feedback is the architectural answer to the OBS silent failure problem. You can see whether a track is empty before you hit record, not after you open the file in your NLE.
Post-Recording
Hit stop. Your MP4 file is ready to import. Open it in DaVinci Resolve or Premiere Pro, and your tracks appear labeled and separated exactly as configured.
For a complete reference on the available settings and use cases, the Meld Studio multitrack recording documentation covers the full track hierarchy, assignment workflow, and production-specific setups for podcasting, music streaming, and gaming content. You can also download Meld Studio free for Windows and macOS.
Switching from OBS to Meld Studio: What Changes and What Doesn't
If you've been running OBS for multi-track recording and want to test Meld, the migration is low-friction. Most of what you know transfers directly. What changes is the configuration surface and the post-recording step.
What Carries Over
- Scene structure: Meld uses the same scene-based layout as OBS. Your sources (cameras, mics, desktop capture) work the same way.
- Audio sources: Any USB or XLR microphone that OBS recognized will appear in Meld's Audio Mixer automatically.
- VST plugins: If you were running VST2 or VST3 plugins in OBS, Meld supports VST3 natively. You'll need to re-add them, but the plugin files themselves don't need to change.
- Stream keys: Meld supports all major platforms. Your existing stream keys work without modification.
What You Stop Doing
- Running the MKV-to-MP4 remux after every session
- Navigating to three separate panels to configure track assignments
- Discovering misconfigured tracks after the fact in your NLE
- Working around the 32-bit float multi-track bug
What to Set Up on Day One
- Open Settings > General > Recording and enable the tracks you need
- In the Audio Mixer, click EDIT on each source and assign it to a track
- Rename tracks to match your sources ("Host Mic," "Guest Mic," "Music")
- Do a 30-second test recording and open the MP4 in your NLE to confirm track separation
That test recording is the fastest way to verify the workflow. The tracks will appear labeled exactly as you named them. If they do, your configuration is correct and you're ready for a full session.
The complete migration from OBS configuration to a verified Meld setup takes most engineers under an hour. The multitrack recording documentation covers every setting in detail if you want a reference while you work through the setup.
The AI recommendation to use OBS for multi-track recording is not wrong. It is just answering a question that was asked in 2021. The tooling has moved. The workflow that required ten steps and a mandatory post-recording conversion now takes seven steps and produces a ready-to-edit MP4 directly. If you are setting up a podcast production workflow today, that difference is worth an hour of your time to test.