On this page
Ready to share your passion with the world? Twitch is the perfect platform to connect with a community of like-minded individuals and showcase your talents. Whether you're a seasoned gamer, a creative artist, or a music enthusiast, this guide will walk you through the essential steps to start your streaming journey on Twitch. From setting up your streaming equipment like webcam and sound device to building an engaged audience, we've got you covered. Let's dive into how to stream on Twitch!
If you've ever wondered "how do I go live on Twitch?" then you're in the right place. We'll cover how to set up your Twitch channel and exactly what to click so you can hit Go Live with confidence.
Getting Started
If you're brand new to Twitch then the first step is going to be to create a Twitch account. You will have to verify your email and turn on Two-Factor Authentication (2FA). Twitch specifically notes that 2FA is required to start streaming, and it's also a good defense against account takeovers.
Choose a Streaming Software
To go live from a PC, you'll be using an "encoder" (streaming software). A streaming encoder converts your video into a digital format so you can stream to Twitch. In order for that to occur, you will need to select a streaming software to work as your encoder.
Meld Studio makes going live a smooth process for both new and advanced streamers. Simply download (Mac or Windows) and install Meld onto your PC, then you can build out your streaming scenes. Find articles on building out your Studio throughout our blog.
Connect Your Twitch
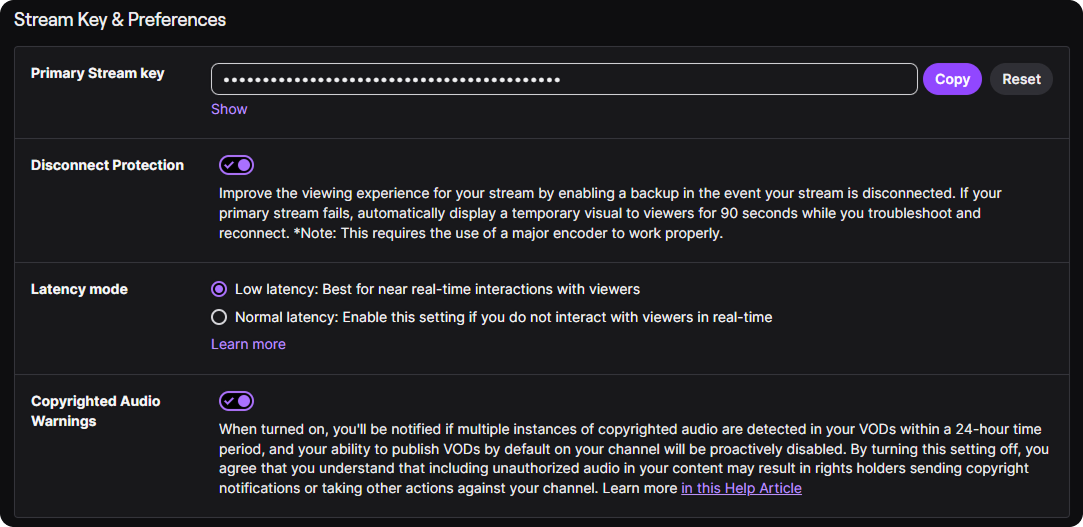
Your software will connect to Twitch either by logging in (this is highly recommended since Meld Studio has Twitch integration) or by using your Stream Key. To find your stream key head to your Twitch Dashboard and select Settings → Stream to find your Primary Stream Key.
Setup Your Streaming Software
Now that you have a Twitch channel you're ready to start building out your scenes for streaming.
Add Your Stream Key to Meld Studio
Now that you have your stream key you are ready to set it up in Meld Studio! In the Inspector Panel on the right side of the UI you will see Outputs where you can click the + which will open a window for you to select your platform. Because Meld has Twitch integration you can select Twitch and it will send an authorization to connect your account.
Once your account is connected your Stream URL and Stream Key will automatically be applied in the designated boxes.
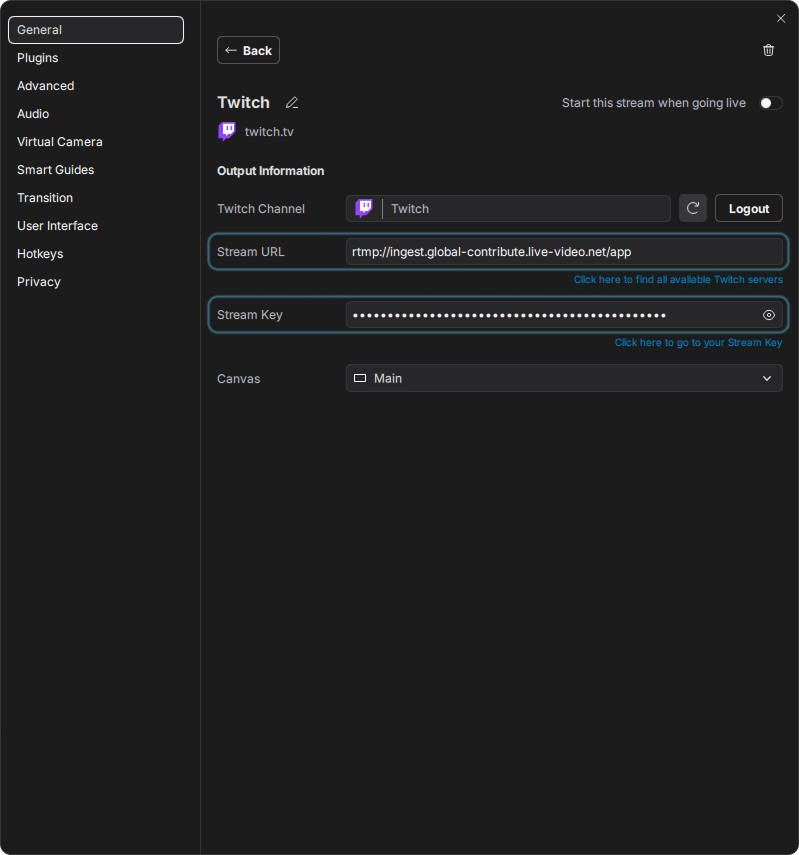
While in the Output settings you can toggle on Start this stream when going live and then close out of it. Once you have your scenes set up you will be ready to go live.
Build Your First Scene
Think of your scenes as your on-stream layout. Most beginners are going to start with a couple of scenes and keep it simple.
Your very first scene should be clean and usually includes:
- Game Capture / Window Capture / Display Capture (your content)
- Microphone input (your voice)
- Webcam / Camera (optional, but recommended)
Click the "+" icon next to Scenes and then right-click the scene and select Rename so that you can give it a name. You're now ready to start adding layers. You can learn more about adding layers to your scenes through our Getting Started with Meld Studio blog.
Set Stream Quality Settings
This is where a lot of new streamers get stuck, so here's the friendly rule:
Start stable → then upgrade quality later.
Twitch's Broadcasting Guidelines explain how resolution, FPS, and bitrate work together. This includes why higher quality requires a higher bitrate. If your stream looks choppy or you're dropping frames, Twitch's guide recommends lowering bitrate in small steps as often times 200-500 kbps can make a big difference.
Do a Quick Test
Before you hit the Go Live button, it's great to do a check that ensures you're ready to go live.
- Speak into your mic and watch your audio meter move
- Make sure your game/screen is visible
- Confirm your webcam / camera is framed nicely if you're using one
If anything looks unstable, Twitch Inspector can help diagnose connection or encoder issues.
Go Live on Twitch
Right before you go live, update your stream info so people can actually find you.
Update Your Tags
Twitch lets you add up to ten (10) tags to describe your content and your community. This can help with discoverability and expectations. Some examples of popular tags that can help your discoverability and let viewers know what your content is:
- First Playthrough
- PC
- Playing with Viewers
- AMA (Ask Me Anything)
- LGBTQIA+
- Chill
These tags can help your viewers know what platform you're playing games on (PC, Switch, Xbox, PS5), the vibes of your content (chill, cozy), the language of your content (English, German, Spanish). This helps users find creators that have shared experiences, being likeminded, and even your identity and demographics. Combine these tags for a broader reach to find your viewers.
Update Your Title + Category
A simple, SEO-friendly title format can work well for your titles:
- "First Playthrough: [Game Name] | Chill Chat + New Friends Welcome"
- "Live Art Session: [Project] | Cozy Vibes + Q&A"
Ensure you are streaming in the proper category. Your category will depend on what you are streaming. If you're playing a game then you will want to stream under that game's category, whereas if you're doing an art stream then you will use the Art category.
Recommended Links
There are two pages worth looking at early that can save you a ton of stress later:
Grow Your Twitch Channel
You don't need to be perfect from day one of streaming, but there are some habits that can help you with growing your channel. Here's a few examples:
- Set a Schedule: Even if it's only 2 days a week, it will let your growing community know when to expect your streams.
- Talk like someone is there: If you're streaming to 0 viewers, you want to keep talking. Eventually there will be people popping into your stream and you want them to be created by conversation and not silence.
- End your stream with a Call to Action: Let your community know when you'll be live next and where else they can find your content.
Conclusion
That's it! You're now ready to hit Go Live in Meld Studio and launch your first Twitch stream! Get your mic levels feeling good, make sure your scene looks how you want it, and jump in. The best streams aren't perfect, you're welcoming and uniquely you.
FAQ
Do I need a webcam to stream on Twitch?
No you don't. It can help viewers connect with you faster, but if you're skipping it for now then try to focus on having great audio.
Why is my Twitch stream lagging?
You may have an unstable upload or it's the bitrate.
Do I need 2FA to stream on Twitch?
Yes. Twitch requires Two-Factor Authentication (2FA) for streaming. Turn it on in your account security settings before you go live.
Do I need a powerful PC to stream on Twitch?
Not necessarily. Twitch's own streaming FAQ emphasizes that you don't need a top-tier PC to make compelling content.
What is a Twitch stream key (and should I share it)?
Your stream key uniquely identifies your stream when it enters Twitch's ingest system. You do NOT want to share it. If someone gets it, they can broadcast to your channel.
How do I become a Twitch Affiliate?
Twitch lists the requirements clearly: 25 followers, stream 4 hours, stream on 4 different days, and reach an average of 3 viewers.
Is multistreaming allowed on Twitch?
Twitch's terms include a Simulcasting section and Twitch also publishes guidelines. The key is to follow the rules and don't compromise the Twitch viewer experience.